3 chain link fence
Latest articles
3 chain link fence
...
3 chain link fence 【3 chain link fence】
Read More
3 chain link fence
...
3 chain link fence 【3 chain link fence】
Read More
3 chain link fenceThorn rope factory production per ton of product profit is not particularly high so in the sales price to wholesale, many users always think that thorn rope price has a lot of profit space so they are eager to lower the price, some manufacturers in order to sell out on the use of low price promise and then underweight behavior. Often the actual user spends less money with the lack of weight is almost the same, so the unit price is relatively high. Because the quotations of the thorn rope factory are in accordance with the real price, the quality is guaranteed. In this way, the customers will not look for debts after the purchase, and the subsequent purchase work will still find us, so that we can benefit.
...
3 chain link fence 【3 chain link fence】
Read More3 chain link fence
...
3 chain link fence 【3 chain link fence】
Read More
3 chain link fenceFor the wide use of screen, the state has regulations. You also specify the diameter size, mesh size, or usage method. For plastering nets, the mesh should be less than 20 and the diameter should be greater than 1 mm. Not only are specifications specified, but safety is preferred if wire mesh is used in exterior plastering nets. If you fall, the consequences are unimaginable. Therefore, the application of norms should be combined with reality.
...
3 chain link fence 【3 chain link fence】
Read More
3 chain link fence
Post time: 07-04-23...
3 chain link fence 【3 chain link fence】
Read More3 chain link fence
...
3 chain link fence 【3 chain link fence】
Read More3 chain link fence
...
3 chain link fence 【3 chain link fence】
Read More3 chain link fence
...
3 chain link fence 【3 chain link fence】
Read More
3 chain link fence
...
3 chain link fence 【3 chain link fence】
Read More
Popular articles
- 5. Maintenance and cleaning in the future

Materials of qualified quality should be kept marked for reference when used. In order to remove the surface film, surface inclusion and other defects on the surface of the large roll galvanized wire on the surface of the sedimentary layer to the local surface, it can be found and treated by conventional technology; Excess foam is caused by soaps and saponable fatty surfactants being brought into the tank. Moderate foam formation rates may be harmless. The presence of small homogeneous particles of large denier in the tank can stabilize the foam layer, but the accumulation of too many solid particles can cause explosion.
- Can adapt to the change of the slope without being damaged, than the rigid structure has a very good safety and stability;
Latest articles
-

-
There are two varieties of steel grid plate is pressure welded steel grid plate and pressure lock steel grid plate, in many people’s eyes, these two products belong to the same variety, in fact, there are still great differences between them in many places.
-
Although galvanized iron wire has the protection of galvanized layer, it does not say that it will not rust at all, but delays the time of rust. In general, cold galvanized iron wire can be kept for 1-2 years without rust, hot galvanized iron wire can be used for 8-10 years without rust. If properly maintained, the use time will be longer. So how to prevent galvanized iron wire rust?
-
In the rolling process, if the surface of the steel wire is rough, the relative friction coefficient of the steel wire and roll increases, the friction resistance increases, the steel wire elongation decreases, the width increases. In the production of weighted leather material is easy to wide, is because of its rough surface. On the contrary, the surface of the steel wire is smooth, because the friction resistance between the steel wire and the roll is small, it is easy to extend, and the width is small. Domestic steel wire in order to prevent rust, the surface coated with butter, such as butter removal is not clean, easy to slip when rolled flat, also affect its width.
-
-
And the air humidity is large, continuous rainy weather, or the environment with large acidity in the air is easy to rust. 304 stainless steel material, if the surrounding environment is too poor will rust.
Links
Step 4 Install the Disc Brake Assembly
how to replace drum brakes to disc brakes
2. Gather Necessary Tools and Parts
As technology continues to evolve, so does the design and functionality of centrifuge brake drums. Innovations like improved materials, such as carbon-carbon composites, are being explored to enhance the performance and thermal stability of brake drums. Additionally, the integration of smart technology allows for real-time monitoring and adjustment of braking systems, ensuring optimal performance and safety.
Het verbeteren van de remprestaties van een voertuig is een prioriteit voor veel autobezit-ters. Een van de meest effectieve upgrades is de conversie van trommelremmen naar schijfremmen. Deze verandering biedt tal van voordelen, waaronder verbeterde remkracht, minder vervorming bij hoge temperaturen en een betere algehele remrespons.
مراحل تعویض پیچ چرخ در ترمزهای درام
Avant de commencer le remplacement, il est important de rassembler le matériel suivant
ब्रेकर ड्रम एक महत्त्वपूर्ण भाग हो जुन गाडीका ब्रेक प्रणालीमा रहेको हुन्छ। यसले ब्रेक पानीको लागि दबाब प्रदान गर्न मद्दत गर्दछ, जसले गर्दा गाडीलाई रोक्न सकिन्छ। तर, कहिलेकाहीँ, एकल ब्रेकर ड्रमको अवस्थामा समस्या हुन सक्छ। यस्तो अवस्थामा धेरै मानिसहरू सोध्न सक्छन् - के मैले केवल एक ब्रेकर ड्रम परिवर्तन गर्न सक्छु?साधारणतया, तपाईं एकल ब्रेकर ड्रम प्रतिस्थापन गर्न सक्नुहुन्छ, तर यो सधैं सिफारिश गरिएको छैन। यदि तपाईंले मात्र एक ब्रेकर ड्रम परिवर्तन गर्नुभयो भने, यसले गाडीको संतुलनमा असर पुर्याउन सक्छ। पार्श्वको परिभाषामा, यदि एक तर्फको ड्रम नयाँ हुन्छ र अर्को तर्फको पुरानो, त यो असमान ब्रेकिङ प्रदर्शन गर्दछ र गाडीको नियन्त्रणमा कठिनाइ ल्याउन सक्छ।जब ब्रेक प्रणालीको कुरा आउँछ, त यो सधैं उत्तम अभ्यास हो कि तपाईँले दुबै ब्रेकर ड्रमहरूलाई एकै समयमा परिवर्तन गर्नुहोस्। यसले गाडीको ब्रेक प्रदर्शनलाई समानता दिनेछ र तपाईँलाई सुरक्षित यात्रा सुनिश्चित गर्नेछ। साथै, नयाँ ब्रेकर ड्रमहरूले पुराना ब्रेकर ड्रमसँग मेल खाउँदैन र यो गर्दा दीर्घकालीन समस्या समाधान गर्न सक्दैन।यदि तपाईंले केवल एक ब्रेकर ड्रम परिवर्तन गर्न निर्णय गर्नुभयो भने, गाडीको अन्य ब्रेक भागहरू जस्तै ब्रेक प्याड र हार्डवेयर पनि जाँच गर्न महत्त्वपूर्ण छ। यो सुनिश्चित गर्न महत्त्वपूर्ण छ कि सबै भागहरूको अवस्था सही हो र तिनीहरूले एकअर्कासँग राम्रोसँग काम गर्दैछन्।अन्ततः, केवल एक ब्रेकर ड्रम परिवर्तन गर्दा सावधानी र विचार आवश्यक छ। यदि तपाईंले गाडीको ब्रेक प्रणालीको अवस्था सुनिश्चित गर्न सक्नुहुन्छ र तपाईंको गाडीलाई सुरक्षित राख्नमा विश्वास गर्नुहुन्छ भने, केवल एक आवश्यक परिवर्तन गर्दा समस्या नहुन सक्छ। तर, सबैभन्दा उत्तम समाधान भनेको दुबै ड्रमहरूलाई एकसाथ परिवर्तन गर्नु हो ताकि गाडीको ब्रेक प्रदर्शन उत्कृष्ट रहिरहोस्। सुरक्षित यात्रा गर्न, यो सबैभन्दा महत्त्वपूर्ण कुरा हो।
can i replace just one brake drum
- برای این کار به ابزارهایی از جمله جک خودرو، دسته جک، آچار مخصوص پیچ چرخ، و یک پیچ جدید نیاز دارید. همچنین، ممکن است به یک انبر و چکش هم نیاز داشته باشید.
Why Upgrade to Disc Brakes?
- .
Conclusie
- .
Det er vigtigt at bemærke, at slibning af bremse-skiver og tromler ikke kun er en service for bilværksteder; det kan også udføres af entusiaster og DIY-mekanikere. Med den rette træning og udstyr kan ejere lære at slibe deres egne bremsekomponenter, hvilket kan være en omkostningseffektiv løsning og give dem mulighed for at opretholde deres køretøjs ydeevne.
Tarvikkeet voiteluun
Проте барабанні гальма мають також свої недоліки. Вони схильні до перегріву під час довготривалого гальмування, що може призвести до зниження їхньої ефективності. Крім того, в умовах високої продуктивності або надвисокої швидкості вони можуть бути менш ефективними в порівнянні з дисковими системами.
Performance Considerations
Drum Brake Pads Qiymətləri Avtomobilinizi Qorumağın Əhəmiyyəti
- .
- Segurança Manter os tambores dentro das especificações prolonga a vida útil do sistema de freio e melhora a segurança do veículo.
Drum brakes are a crucial component in vehicle braking systems, providing effective stopping power through a unique mechanism. Understanding the components of a drum brake can help one appreciate how it functions and its significance in automotive design.
Jarrusatulan tarkastus tulpan avulla on erityisen tärkeää säännöllisissä huoltotoimenpiteissä. Autoilijoiden tulisi olla tietoisia siitä, että epätyypilliset äänet jarruttaessa tai jarrujen väheneminen saattaa viitata ongelmaan, joka on tutkittava tarkasti. Jarrujärjestelmässä olevat ongelmat voidaan usein havaita ennen kuin ne kasvavat suuriksi ongelmiksi, mikä voi säästää aikaa ja rahaa pitkällä aikavälillä.
4. Apply Rust Penetrant Generously spray a rust penetrant or lubricant around the edges of the drum, particularly where it meets the hub. Let it sit for about 15-20 minutes to allow the lubricant to soak in. This can help break down any corrosion or debris that is causing the drum to stick.
- .
6. Using a Pry Bar or Drum Puller If the drum still won’t budge, insert a pry bar between the drum and the backing plate. Apply firm pressure to see if it pops off. Alternatively, you might use a drum puller if you have one available; these tools are specifically designed for this task and can provide the necessary leverage.
7. फिनिश टच जंग हटाने के बाद, ब्रेक ड्रम को अच्छे से पानी से धो लें और सुखा लें। इसके बाद, एंटी-रस्ट स्प्रे का उपयोग करें ताकि भविष्य में जंग लगने से बचा जा सके।
- .
The Classic Mini, a beloved icon of British motoring, has captivated enthusiasts since its introduction in the 1960s. However, as with any classic car, some of its features may not meet modern performance expectations. One area that drivers often seek to upgrade is the braking system. Converting from drum to disc brakes can significantly enhance stopping power, safety, and overall driving experience. In this article, we’ll explore the benefits of this conversion, the necessary components, and the steps to complete the process.
Kendiliğinden Güçlenen Tambur Frenler
- - Nye tromlebremser
Vaiheittainen ohje voiteluun
how to grease drum brakes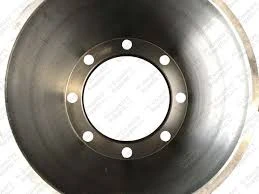
One of the main advantages of drum brakes is their ability to generate a significant amount of friction, even with smaller components. This makes them particularly effective for rear brakes in many older vehicles and in certain trucks. Additionally, drum brakes are less susceptible to water and debris, which can be a significant factor in maintaining braking efficiency. They are also generally more cost-effective, with fewer parts that require regular maintenance.
นอกจากนี้ ยังต้องพิจารณาหมุนเวียนระบบเบรกทั้งระบบ เพื่อให้แน่ใจว่ามีการทำงานที่สมดุลและมีประสิทธิภาพ คุณอาจจะต้องปรึกษากับช่างผู้ชำนาญในการติดตั้งหรือเปลี่ยนแปลงระบบเบรก เพื่อให้แน่ใจว่าการเปลี่ยนแปลงนี้จะปลอดภัยและมีประสิทธิภาพในระยะยาว
Ennen kuin aloitat voiteluprosessin, on tärkeää kerätä tarvittavat työkalut ja tarvikkeet. Tarvitset
2. Gather Necessary Tools and Parts
Next, measure the drum’s thickness. Use the micrometer to gauge the thickness of the material. Again, take multiple readings at various points to determine any uneven wear that may have occurred. The minimum thickness is often stamped on the drum itself; ensure that your measurements meet or exceed this value.
Measuring brake drums is an essential task for anyone involved in automotive maintenance and repair. Properly measuring brake drums ensures that you select the right replacement parts, ultimately contributing to vehicle safety and performance. Whether you are a professional mechanic or a DIY enthusiast, understanding how to accurately measure brake drums is crucial. Here’s a step-by-step guide to help you through the process.
بوش - بوش مەسىلىدە، سىزنىڭ بوسۇغىڭىزدا بوسىمغا قېلىپ قالمايدىغان تېخىمۇ قالتىس ئورۇندۇر، شۇنداقلا، شۇردا بوسىمغا بوسامىز. بوسىم، ئەگەر سىزنىڭ بوسوڭاڭىزدىكى بوش بوسىم بوپ قالسا، بوسۇغىڭىزغا قايتۇرۇشقا بولىدىغان بىر ساددادىر. مەسىلەن، بوسىمغا قېتىب بولغان گۈمۈش تۇرغاقلىرىغا تەڭشەش ئۈچۈن، گۈمۈش بوسۇق قاپاقينىڭ قۇرۇلمىلىق نۇقتىلىرىغا توغرا بوسىمغا نازار سالسىڭىز، بوسامىز.
Conversie van Trommelremmen naar Schijfremmen
ด้วยความสำคัญของกลองเบรกและแผ่นรองเบรกในการทำงานของระบบเบรก การดูแลและบำรุงรักษาจึงเป็นสิ่งที่จำเป็นเพื่อให้แน่ใจว่ารถยนต์ของคุณจะมีความปลอดภัยและเชื่อถือได้ในทุกการเดินทาง
Trommelbremsen sind ein wichtiger Bestandteil vieler Fahrzeuge, insbesondere bei älteren Modellen und Nutzfahrzeugen. Im Laufe der Zeit benötigen die Bremsbeläge, auch als Bremsschuh bezeichnet, eine regelmäßige Wartung und gegebenenfalls einen Austausch. Um diesen Prozess effizient und sicher durchzuführen, ist das richtige Werkzeug unerlässlich. In diesem Artikel werden wir die verschiedenen Werkzeuge vorstellen, die für den Austausch und die Wartung von Trommelbremsschuhen erforderlich sind.
Η επιλογή ενός αξιόπιστου κιτ αναβάθμισης φρένων είναι επίσης καθοριστική. Υπάρχουν πολλές εταιρείες που προσφέρουν εξαιρετικά προϊόντα, αλλά είναι σημαντικό να διαβάσετε κριτικές και να κάνετε έρευνα πριν την αγορά. Μια σωστή επιλογή μπορεί να μεταμορφώσει την οδήγηση, προσφέροντας αυξημένη ασφάλεια και καλύτερη αίσθηση του ελέγχου.
Step 5 Reassemble the Drum Brake System
The Honda Civic, a stalwart in the compact car segment, has earned a reputation for reliability, efficiency, and performance. One of the less glamorous yet crucial components of this vehicle is its braking system, particularly the rear drum brakes found in some of its models. While many modern vehicles have transitioned to disc brakes for all four wheels, Honda has retained drum brakes on the rear in certain Civic models, especially those with lower trims and less powerful engines.
4. Répétition par roue
When measuring brake drums, technicians generally use precision tools, such as calipers or micrometers. The inner diameter is the most critical measurement, as it dictates how well the brake shoes will fit and function. If the drum's inner diameter has expanded beyond the recommended limit, it can lead to ineffective braking and potential failure of the braking system. Additionally, measuring the total thickness helps identify any significant wear that could compromise structural integrity.
When it comes to vehicle braking systems, two main types dominate the market drum brakes and disc brakes. Both systems are designed to halt a vehicle's movement, but they operate on different principles and have distinct advantages and disadvantages. Understanding these differences can help consumers choose the right braking system for their needs.
Le remplacement des plaquettes de frein à tambour est une opération cruciale pour garantir la sécurité de votre véhicule. Les freins à tambour, bien que moins courants sur les véhicules modernes, sont toujours utilisés sur de nombreux modèles, en particulier les voitures anciennes et certains véhicules utilitaires. Comprendre quand et comment remplacer ces plaquettes peut faire une grande différence en matière de performance et de sécurité.Tout d'abord, il est important de savoir quand les plaquettes de frein doivent être remplacées. Généralement, vous devriez inspecter les freins tous les 20 000 à 30 000 kilomètres ou dès que vous remarquez des signes d'usure, comme un bruit de grincement ou une diminution de l'efficacité du freinage. Un frottement anormal, une pédale de frein molle ou des vibrations lors du freinage peuvent également indiquer qu'un remplacement est nécessaire.Le processus de remplacement des plaquettes de frein à tambour peut être réalisé par soi-même, mais il nécessite quelques outils spécifiques, notamment un cric, des clés à molette, et un jeu de tournevis. Avant de commencer, assurez-vous d'avoir à portée de main des plaquettes neuves, car il est souvent conseillé de remplacer les deux côtés pour maintenir un équilibre dans le système de freinage.Commencez par lever le véhicule et retirer la roue. Une fois la roue enlevée, accédez au tambour de frein. Vous devrez probablement retirer quelques boulons pour pouvoir enlever le tambour. Inspectez l'état des plaquettes existantes et du tambour lui-même. Si le tambour est usé, il peut être nécessaire de le remplacer ou de le rectifier.Pour retirer les anciennes plaquettes, dévissez les attaches et retirez-les soigneusement. Installez les nouvelles plaquettes en veillant à respecter le bon positionnement. Remettez tout en place en vous assurant que tout est bien fixé. Terminez le processus en remettant la roue et en abaissant le véhicule.Avant de prendre la route, testez le système de freinage à basse vitesse pour vous assurer que tout fonctionne correctement. Un bon entretien des freins à tambour peut prolonger leur durée de vie et assurer votre sécurité sur la route. Si vous n'êtes pas à l'aise avec cette procédure, il est toujours recommandé de consulter un professionnel. N'oubliez pas que des freins en bon état sont essentiels pour la sécurité de tous les occupants du véhicule.
drum brake shoes replacement
Obsolete Brake Drums Understanding the Implications and Transition to Modern Alternatives
However, there are some downsides to drum brakes. They tend to be heavier than their disc counterparts, which can slightly affect the overall weight distribution of the vehicle. This might have an impact on handling and efficiency, although it’s often negligible in smaller cars like the Civic. Moreover, drum brakes tend to hold heat more than disc brakes, which can lead to quicker wear if they’re used aggressively, such as in high-performance situations.